
Spring快速入门
简介
- Spring 是分层的 Java SE/EE 应用 full-stack 轻量级开源框架,以 IOC 和 AOP 为内核。
- Spring 底层用的是反射。
- Spring在创建Bean时,会优先选择使用无参构造方法来实例化对象。
快速入门
在 Maven 工程中导入相关依赖
pom.xml
<dependencies>
    <dependency>
        <groupId>org.springframework</groupId>
        <artifactId>spring-context</artifactId>
        <version>5.2.6.RELEASE</version>
    </dependency>
    <dependency>
        <groupId>junit</groupId>
        <artifactId>junit</artifactId>
        <version>4.13</version>
        <scope>test</scope>
    </dependency>
</dependencies>
编写接口和实现类
public interface UserDao {
    void add();
}
public class UserDaoImpl implements UserDao {
@Override
public void add() {
System.out.println("UserDao saving ....");
}
}public interface UserService {
void save();
}public class UserServiceImpl implements UserService {
@Override
public void save() {
System.out.println("UserService saving....");
}
}编写 Spring 核心配置文件
applicationContext.xml
<?xml version="1.0" encoding="UTF-8"?>
<beans xmlns="http://www.springframework.org/schema/beans"
       xmlns:xsi="http://www.w3.org/2001/XMLSchema-instance"
       xsi:schemaLocation="http://www.springframework.org/schema/beans
       http://www.springframework.org/schema/beans/spring-beans.xsd">

	<!-- 配置两个由spring容器管理的bean -->
    <bean id="userDao" class="top.blueboy.Dao.impl.UserDaoImpl" />
    <bean id="userService" class="top.blueboy.service.impl.UserServiceImpl" />

</beans>
编写测试类
public class Test1 {
    @Test
    public void test1() {
        ApplicationContext ctx = new ClassPathXmlApplicationContext("applicationContext.xml");
        //从容器中获取bean
        UserDao userDao = (UserDao) ctx.getBean("userDao");
        userDao.add();

        UserService userService = (UserService) ctx.getBean("userService");
        userService.save();

    }
}
运行结果:
UserDao saving ....
UserService saving....

进程已结束,退出代码为 0
控制反转
控制反转的是对象的创建权,实现了对象不由我们手动创建,而是由 Spring 提供的 IOC 容易统一管理和创建对象。
做完如上案例我们就已经体会过了对象由容器提供的过程。
bean
基础属性
| 属性 | 取值范围 | 说明 | 备注 | ||
|---|---|---|---|---|---|
| id | 符合标识符的取名 | 标注该 bean 的唯一标识,不可重复 | |||
| class | 实现类的全类名 | 该 bean 是从哪里加载的,也就是它的根 | 不可以写接口,要写实现类,实现类才可以造对象然后返还给我们。 |
作用范围
| 属性 | 取值范围 | 说明 | 备注 | ||
|---|---|---|---|---|---|
| scope | singleton | 标注该 bean 是单例的,在 IOC 容器中存在一份,重复使用。 | - 如果不写 scope,默认 scope="singleton", - 该 bean 是伴随着容器创建和销毁而创建和销毁。容器在它就在。 - bean 对象只有一个就避免了对象的频繁创建与销毁,达到了 bean 对象的复用. | ||
| prototype | 标注该 bean 是非单例的,getBean 一次就会造出一个新的对象。 | - 使用对象时(getBean)创建,一直在在使用它就一直存在, - 该对象会在长时间不使用后被回收。 |
生命周期
| 属性 | 取值范围 | 说明 | 备注 | ||
|---|---|---|---|---|---|
| init-method | 指定类中的初始化方法名称 | ||||
| destroy-method | 指定类中销毁方法名称 |
初始化时机
| 属性 | 取值范围 | 说明 | 备注 | ||
|---|---|---|---|---|---|
| lazy-init | true | 配置为只有在第一次被请求时才会被实例化。 | |||
| false | 默认值,即非延迟加载,而是立即加载实例化 |
如何理解 bean?
bean 是如何被创建出来的?
- 配置好 bean 中的相关属性配置
- spring 加载
applicationContext.xml- 默认情况(lazy-init=false)下,在加载配置文件时直接根据 bean 标签中 class 值生成实现类的对象放在容器中供后续使用。
- 使用 getBean 即可从容器中获取对象。
Bean实例化的三种方式
无参构造方法实例化
<bean id="userDao" class="top.blueboy.dao.impl.UserDaoImpl">id + class ——> 直接根据无参构造方法 new 一个对象出来
静态工厂实例化
public class OrderDaoFactory {
	public static OrderDao getOrderDao(){
		System.out.println("factory setup....");//模拟必要的业务操作
		return new OrderDaoImpl();
	}
}
applicationContext.xml
<bean id="orderDao" class="top.blueboy.factory.OrderDaoFactory" factorymethod="getOrderDao"/>id + class + factory method ——> 调用 factory-method 方法获取某实现类对象spring能理解这句话,就是配置了个静态工厂,把静态工厂中的静态方法返回的值,也就是返回的对象放到容器中,以便后续使用。
实例工厂实例化
public class UserDaoFactory {
	public UserDao getUserDao(){
		return new UserDaoImpl();
	}
}
applicationContext.xml
<bean id="userFactory" class="top.blueboy.factory.UserDaoFactory"/>
<bean id="userDao" factory-bean="userFactory" factory-method="getUserDao" />
先把工厂类的对象,给容器接管造出来,然后才能根据这个对象中的方法造 userDao
依赖注入
绑定对象与对象之间的依赖关系。获取到对象时,对该对象中的依赖对象的进行赋值。
依赖注入的方式
构造方法注入
applicationContext.xml
<?xml version="1.0" encoding="UTF-8"?>
<beans xmlns="http://www.springframework.org/schema/beans"
       xmlns:xsi="http://www.w3.org/2001/XMLSchema-instance"
       xsi:schemaLocation="http://www.springframework.org/schema/beans
       http://www.springframework.org/schema/beans/spring-beans.xsd">

    <bean id="userDao" class="top.blueboy.Dao.impl.UserDaoImpl" />
    <bean id="userService" class="top.blueboy.service.impl.UserServiceImpl" >
	    <!--
		    构造器注入
		    name 要赋值的属性名
		    ref  引用赋值
		  -->
        <constructor-arg name="userDao" ref="userDao" />
    </bean>

</beans>
set 方法注入
applicationContext.xml
<?xml version="1.0" encoding="UTF-8"?>
<beans xmlns="http://www.springframework.org/schema/beans"
       xmlns:xsi="http://www.w3.org/2001/XMLSchema-instance"
       xsi:schemaLocation="http://www.springframework.org/schema/beans
       http://www.springframework.org/schema/beans/spring-beans.xsd">

    <bean id="userDao" class="top.blueboy.Dao.impl.UserDaoImpl" />
    <bean id="userService" class="top.blueboy.service.impl.UserServiceImpl" >
	    <!--  set注入  -->
        <!--  name指的是setXXX的XXX,但是因为我们都是标准命名,所以也可以认为就是属性的名字  -->
        <property name="userDao" ref="userDao"/>
    </bean>
</beans>
名称空间注入
applicationContext.xml
<?xml version="1.0" encoding="UTF-8"?>
<beans xmlns="http://www.springframework.org/schema/beans"
       xmlns:xsi="http://www.w3.org/2001/XMLSchema-instance"
       xmlns:p="http://www.springframework.org/schema/p"
       xsi:schemaLocation="http://www.springframework.org/schema/beans
       http://www.springframework.org/schema/beans/spring-beans.xsd">

    <bean id="userDao" class="top.blueboy.Dao.impl.UserDaoImpl" />
    <bean id="userService" class="top.blueboy.service.impl.UserServiceImpl" p:userDao-ref="userDao" />
    <!--  userDao还是指的是setXXX中的XXX的名字 --><!--  等号后是bean id -->
</beans>
测试程序,以上三种注入方式达成的效果均一致。
public class Test1 {
    @Test
    public void test1() {
        ApplicationContext ctx = new ClassPathXmlApplicationContext("applicationContext.xml");
        UserService userService = (UserService) ctx.getBean("userService");
        userService.save();

    }
}
不同类型的注入
简单类型的注入
@Data
@AllArgsConstructor
@NoArgsConstructor
public class Department {
    private Integer id;//部门编号
    private String name;//部门名称
    private String desc;//部门描述
}
applicationContext.xml
<?xml version="1.0" encoding="UTF-8"?>
<beans xmlns="http://www.springframework.org/schema/beans"
       xmlns:xsi="http://www.w3.org/2001/XMLSchema-instance"
       xmlns:p="http://www.springframework.org/schema/p"
       xsi:schemaLocation="http://www.springframework.org/schema/beans http://www.springframework.org/schema/beans/spring-beans.xsd">

    <!-- 简单类型的注入 -->
    <bean id="department" class="top.blueboy.bean.Department">
        <property name="id" value="1"/>
        <property name="name" value="研发部"/>
        <property name="desc" value="研发超级牛逼的产品"/>
    </bean>

</beans>@Test
public void test2() {
ApplicationContext ctx = new ClassPathXmlApplicationContext("applicationContext.xml");
Department dp = (Department) ctx.getBean("department");
System.out.println(dp);
}Department(id=1, name=研发部, desc=研发超级牛逼的产品)
进程已结束,退出代码为 0引用类型的注入
@Data
@AllArgsConstructor
@NoArgsConstructor
public class Department {
    private Integer id;//部门编号
    private String name;//部门名称
    private String desc;//部门描述
    private Address address;
}
applicationContext.xml
<!-- 引用类型的注入 -->
<bean id="address" class="top.blueboy.bean.Address" >
    <property name="province" value="山东省" />
    <property name="city" value="青岛市" />
    <property name="county" value="市北区" />
    <property name="street" value="龙城路" />
    <property name="no" value="31号" />
</bean>
<bean id="department" class="top.blueboy.bean.Department">
    <property name="id" value="1"/>
    <property name="name" value="研发部"/>
    <property name="desc" value="研发超级牛逼的产品"/>
    <!-- ref=某beanid -->
    <property name="address" ref="address" />
</bean>@Test
public void test3() {
ApplicationContext ctx = new ClassPathXmlApplicationContext("applicationContext.xml");
Department dp = (Department) ctx.getBean("department");
System.out.println(dp);
}Department(id=1, name=研发部, desc=研发超级牛逼的产品, address=Address(province=山东省, city=青岛市, county=市北区, street=龙城路, no=31号))
进程已结束,退出代码为 0数组的注入
<property name="array">
	<array>
		<value>100</value>
		<value>200</value>
		<value>300</value>
	</array>
</property>
集合类型的注入
List
@Data
@AllArgsConstructor
@NoArgsConstructor
public class Employee {
    private Integer id;//员工编号
    private String name;//姓名
    private Integer age;//年龄
    private String gender;//性别
    private List<String> hobby;//爱好
}
applicationContext.xml
<!-- list注入 -->
<bean id="employee" class="top.blueboy.bean.Employee">
    <property name="id" value="1"/>
    <property name="name" value="初音未来"/>
    <property name="age" value="18"/>
    <property name="gender" value="女"/>
    <property name="hobby">
        <list>
            <value>唱歌</value>
            <value>跳舞</value>
            <value>Coser</value>
        </list>
    </property>
</bean>@Test
public void test4() {
ApplicationContext ctx = new ClassPathXmlApplicationContext("applicationContext.xml");
Employee dp = (Employee) ctx.getBean("employee");
System.out.println(dp);
}Employee(id=1, name=初音未来, age=18, gender=女, hobby=[唱歌, 跳舞, Coser])
进程已结束,退出代码为 0list<引用类型>
@Data
@AllArgsConstructor
@NoArgsConstructor
public class Department {
    private Integer id;//部门编号
    private String name;//部门名称
    private String desc;//部门描述
    private Address address;
    private List<Employee> employees;
}
applicationContext.xml
<!-- list注入 -->
<bean id="e1" class="top.blueboy.bean.Employee">
    <property name="id" value="1"/>
    <property name="name" value="初音未来"/>
    <property name="age" value="18"/>
    <property name="gender" value="女"/>
    <property name="hobby">
        <list>
            <value>唱歌</value>
            <value>跳舞</value>
            <value>Coser</value>
        </list>
    </property>
</bean>

<bean id="e2" class="top.blueboy.bean.Employee">
    <property name="id" value="2"/>
    <property name="name" value="洛天依"/>
    <property name="age" value="18"/>
    <property name="gender" value="女"/>
    <property name="hobby">
        <list>
            <value>唱歌</value>
            <value>跳舞</value>
            <value>Coser</value>
        </list>
    </property>
</bean>

<bean id="address1" class="top.blueboy.bean.Address" >
    <property name="province" value="山东省" />
    <property name="city" value="青岛市" />
    <property name="county" value="市北区" />
    <property name="street" value="龙城路" />
    <property name="no" value="31号" />
</bean>
<bean id="department1"  class="top.blueboy.bean.Department">
    <property name="id" value="1"/>
    <property name="name" value="宣发部"/>
    <property name="desc" value="宣发牛逼的产品"/>
    <property name="address" ref="address1"/>
    <property name="employees">
        <list>
            <ref bean="e1"/>
            <ref bean="e2"/>
        </list>
    </property>
</bean>@Test
public void test5() {
ApplicationContext ctx = new ClassPathXmlApplicationContext("applicationContext.xml");
Department dp = (Department) ctx.getBean("department1");
System.out.println(dp);
}Department(id=1, name=宣发部, desc=宣发牛逼的产品, address=Address(province=山东省, city=青岛市, county=市北区, street=龙城路, no=31号), employees=[Employee(id=1, name=初音未来, age=18, gender=女, hobby=[唱歌, 跳舞, Coser]), Employee(id=2, name=洛天依, age=18, gender=女, hobby=[唱歌, 跳舞, Coser])])
进程已结束,退出代码为 0Map
@Data
@AllArgsConstructor
@NoArgsConstructor
public class Department {
    private Integer id;//部门编号
    private String name;//部门名称
    private String desc;//部门描述
    private Address address;
    private Map<String, Employee> leader;//部门主管
    private List<Employee> employees;
}
applicationContext.xml
<!-- map注入 -->
<bean id="e1" class="top.blueboy.bean.Employee">
    <property name="id" value="1"/>
    <property name="name" value="初音未来"/>
    <property name="age" value="18"/>
    <property name="gender" value="女"/>
    <property name="hobby">
        <list>
            <value>唱歌</value>
            <value>跳舞</value>
            <value>Coser</value>
        </list>
    </property>
</bean>

<bean id="e2" class="top.blueboy.bean.Employee">
    <property name="id" value="2"/>
    <property name="name" value="宫崎骏"/>
    <property name="age" value="55"/>
    <property name="gender" value="男"/>
    <property name="hobby">
        <list>
            <value>画画</value>
            <value>动漫</value>
            <value>拍摄</value>
        </list>
    </property>
</bean>

<bean id="address2" class="top.blueboy.bean.Address" >
    <property name="province" value="山东省" />
    <property name="city" value="青岛市" />
    <property name="county" value="市北区" />
    <property name="street" value="龙城路" />
    <property name="no" value="31号" />
</bean>
<bean id="department2"  class="top.blueboy.bean.Department">
    <property name="id" value="1"/>
    <property name="name" value="宣发部"/>
    <property name="desc" value="宣发牛逼的产品"/>
    <property name="address" ref="address2"/>
    <property name="leader">
        <map>
            <entry key="CEO" value-ref="e2" />
        </map>
    </property>
    <property name="employees">
        <list>
            <ref bean="e1"/>
        </list>
    </property>
</bean> @Test
public void test6() {
ApplicationContext ctx = new ClassPathXmlApplicationContext("applicationContext.xml");
Department dp = (Department) ctx.getBean("department2");
System.out.println(dp);
}Department(id=1, name=宣发部, desc=宣发牛逼的产品, address=Address(province=山东省, city=青岛市, county=市北区, street=龙城路, no=31号), leader={CEO=Employee(id=2, name=宫崎骏, age=55, gender=男, hobby=[画画, 动漫, 拍摄])}, employees=[Employee(id=1, name=初音未来, age=18, gender=女, hobby=[唱歌, 跳舞, Coser])])
进程已结束,退出代码为 0Properties
@Data
@AllArgsConstructor
@NoArgsConstructor
public class JdbcConfig {
    private Properties config;
}
applicationContext.xml
<!-- properties注入 -->
<bean id="jdbcConfig" class="top.blueboy.bean.JdbcConfig">
    <!-- Properties类型的注入 -->
    <property name="config">
        <props>
            <prop key="driverName">com.mysql.jdbc.Driver</prop>
            <prop key="url">jdbc:mysql://localhost:3306/test</prop>
            <prop key="username">root</prop>
            <prop key="password">root</prop>
        </props>
    </property>
</bean>@Test
public void test7() {
ApplicationContext ctx = new ClassPathXmlApplicationContext("applicationContext.xml");
JdbcConfig jc = (JdbcConfig) ctx.getBean("jdbcConfig");
System.out.println(jc);
}JdbcConfig(config={password=root, url=jdbc:mysql://localhost:3306/test, driverName=com.mysql.jdbc.Driver, username=root})
进程已结束,退出代码为 0拆分配置并引入
简洁核心配置文件中的配置数量。
案例配置数据源
applicationContext.xml
<?xml version="1.0" encoding="UTF-8"?>
<beans xmlns="http://www.springframework.org/schema/beans"
       xmlns:xsi="http://www.w3.org/2001/XMLSchema-instance"
       xmlns:p="http://www.springframework.org/schema/p"
       xsi:schemaLocation="http://www.springframework.org/schema/beans
       http://www.springframework.org/schema/beans/spring-beans.xsd">

    <import resource="classpath:applicationContext-dataSource.xml"/>
</beans>
applicationContext-dataSource.xml
<?xml version="1.0" encoding="UTF-8"?>
<beans xmlns="http://www.springframework.org/schema/beans"
       xmlns:xsi="http://www.w3.org/2001/XMLSchema-instance"
       xmlns:context="http://www.springframework.org/schema/context"
       xsi:schemaLocation="http://www.springframework.org/schema/beans
        http://www.springframework.org/schema/beans/spring-beans.xsd
        http://www.springframework.org/schema/context
        http://www.springframework.org/schema/context/spring-context.xsd">

    <context:property-placeholder location="jdbc.properties"/>

    <bean id="dataSource" class="com.alibaba.druid.pool.DruidDataSource">
        <property name="driverClassName" value="${jdbc.driver}"/>
        <property name="url" value="${jdbc.url}"/>
        <property name="username" value="${jdbc.username}"/>
        <property name="password" value="${jdbc.password}"/>
        <property name="initialSize" value="${jdbc.initialSize}"/>
        <property name="maxActive" value="${jdbc.maxActive}"/>
        <property name="minIdle" value="${jdbc.minIdle}"/>
    </bean>

</beans>
jdbc.properties
jdbc.driver=com.mysql.jdbc.Driver
jdbc.url=jdbc:mysql://localhost:3306/webtest?useSSL=false&useUnicode=true&characterEncoding=utf-8
jdbc.username=root
jdbc.password=root
##初始化连接数量
jdbc.initialSize=10
##最大连接数量
jdbc.maxActive=50
##最小空闲连接
jdbc.minIdle=5@Test
public void test1() throws SQLException {
ApplicationContext ctx = new ClassPathXmlApplicationContext("applicationContext.xml");
DataSource dataSource = (DruidDataSource)ctx.getBean("dataSource");
Connection connection = dataSource.getConnection();
System.out.println(connection);
}动态代理
什么是动态代理
动态代理是一种在不修改源码的情况下对方法进行增强的技术。
代理对象 = 目标对象 + 增强(也叫通知)目标对象:被增强的对象,被代理的对象。
代理对象:需要目标对象,然后在目标对象上添加了增强后的对象。
目标方法:被增强的方法。
到现在为止,我们需要知道有一种方式可以在不改变目标对象方法的前提下,对方法进行增强,这个方式就是动态代理。使用它,我们需要提供目标对象和增强生成代理对象。
得到了代理对象就相当于有了一个强化版的目标对象,运行相关方法,除了运行方法本身,增强的内容也会被运行,从而实现了在不改变源码的前提下,对方法进行增强。
JDK 的动态代理
//表示服务员的接口
public interface IWaiter {
    //提供服务的方法
    void serve();
}
//目标类
public class ManWaiter implements IWaiter {
//目标方法
@Override
public void serve() {
System.out.println("服务...");
}
}//增强
public class Advice {
/*
前置增强,在目标方法之前运行
*/
public void before() {
System.out.println("您好...");
}
/*
后置增强,在目标方法之后运行
*/
public void after() {
System.out.println("再见...");
}
}//测试基于JDK的动态代理,实现在不修改ManWaiter方法源码的情况下,对ManWaiter的的方法进行增强
@Test
public void testJdkProxy() {
//目标对象
IWaiter manWaiter = new ManWaiter();
//通知对象
Advice advice = new Advice();
//代理对象
/**
* ClassLoader: 类加载器
* 用于加载代理对象字节码,和被代理对象使用相同的类加载器,写法固定
* Class<?>[]:字节码数组
* 用于让代理对象和被代理对象有相同方法,写法固定
* InvocationHandler:提供增强的代码
* 用于我们写如何代理,我们一般都行写这个接口的实现类,通常情况下是匿名内部类
*
*/
//代理对象
IWaiter waiter = (IWaiter) Proxy.newProxyInstance(
//参数1
manWaiter.getClass().getClassLoader(),
//参数2
manWaiter.getClass().getInterfaces(),
//参数3
new InvocationHandler() {
@Override
/**
* 作用:执行被代理对象的任何接口方法都会经过该方法
* proxy:代理对象的引用
* method:当前执行的方法
* args:当前执行方法所需的参数
* 返回值:和被代理对象方法有相同的返回值
*
*/
//配置一下方法运行顺序
public Object invoke(Object proxy, Method method, Object[] args) throws Throwable {
//前置增强
advice.before();
//执行被增强方法
Object result = method.invoke(manWaiter, args);
//后置增强
advice.after();
//返回原方法执行结果
return result;
}
}
);
//原目标对象(增强前)
manWaiter.serve();
System.out.println("------------");
//代理对象(增强后)
waiter.serve();
}cglib 的动态代理
pom.xml
<dependency>
    <groupId>cglib</groupId>
    <artifactId>cglib</artifactId>
    <version>2.2</version>
</dependency>
public class WomanWaiter {
public void serve() {
System.out.println("服务...");
}
}//增强
public class Advice {
public void before() {
System.out.println("您好...");
}
public void after() {
System.out.println("再见...");
}
}/**
* 涉及的类:Enhancer
* 提供者:第三方cglib库
* 如何创建代理对象:使用Enhancer类中的create方法
* 创建代理对象的要求:被代理类不能是final类
* create方法的参数:
* Class:字节码
* 用于指定被代理对象的字节码
* Callback:用于提供增强的代码
* 它是让我们写如何代理,一般都是写一些该接口的实现类,通常情况下是匿名内部类。
* 一般写的都是该接口的子接口实现类:MethodInterceptor
*
*/
@Test
public void testCglib() {
//目标对象
WomanWaiter waiter = new WomanWaiter();
//通知对象
Advice advice = new Advice();
//代理对象
WomanWaiter proxyWaiter = (WomanWaiter)Enhancer.create(
//参数1
waiter.getClass(),
//参数2
new MethodInterceptor() {
/**
* 执行被代理对象的任何方法都会经过该方法
*
* 前三个参数和基于接口的动态代理中invoke方法的参数是一样的
*/
//绑定一个顺序关系
@Override
public Object intercept(Object o, Method method, Object[] objects, MethodProxy methodProxy) throws Throwable {
advice.before();
Object result = method.invoke(waiter, objects);
advice.after();
return result;
}
});
//执行目标对象的方法
proxyWaiter.serve();
}代理工厂的动态代理
@Data
public class ProxyFactory {
    private Object targetOjb;
    private BeforeAdvice beforeAdvice;
    private AfterAdvice afterAdvice;

    public Object createProxyOjb() {
        //参数1::获取目标类的类加载器
        ClassLoader classLoader = this.targetOjb.getClass().getClassLoader();
        //参数2: 获取目标类的实现接口
        Class[] interfaces = this.targetOjb.getClass().getInterfaces();
        //参数3:创建一个 InvocationHandler接口的匿名内部类,并且重写invoke方法
        //可以把参数3完成的内容理解为组织通知的调用时机
        InvocationHandler invocationHandler = new InvocationHandler() {
            @Override
            public Object invoke(Object proxy, Method method, Object[] args) throws Throwable {

                Object resultOjb = null;

                if (beforeAdvice != null) {
                    beforeAdvice.before();
                }

                resultOjb = method.invoke(targetOjb, args);

                if (afterAdvice != null) {
                    afterAdvice.after();
                }

                //总不能增强完方法之后原来的返回值都没了吧?
                return resultOjb;
            }
        };

        //组织,得到代理对象
        return Proxy.newProxyInstance(classLoader, interfaces, invocationHandler);

    }
}@Test
public void test2() {
//创建代理工厂
ProxyFactory factory = new ProxyFactory();
//创建增强
BeforeAdvice beforeAdvice = new BeforeAdviceImpl();
AfterAdvice afterAdvice = new AfterAdviceImpl();
//设置目标对象
factory.setTargetOjb(new WaiterImpl());
//设置增强
factory.setBeforeAdvice(beforeAdvice);
factory.setAfterAdvice(afterAdvice);
//创建代理对象
Waiter proxyObject = (Waiter) factory.createProxyOjb();
//执行目标方法
proxyObject.service();
}代理工厂和 Spring 的动态代理
applicationContext.xml
<?xml version="1.0" encoding="UTF-8"?>
<beans xmlns="http://www.springframework.org/schema/beans"
       xmlns:xsi="http://www.w3.org/2001/XMLSchema-instance"
       xmlns:p="http://www.springframework.org/schema/p"
       xsi:schemaLocation="http://www.springframework.org/schema/beans
       http://www.springframework.org/schema/beans/spring-beans.xsd">

        <bean id="beforeAdvice" class="top.blueboy.advice.BeforeAdviceImpl"/>
        <bean id="afterAdvice" class="top.blueboy.advice.AfterAdviceImpl" />
        <bean id="manWaiter" class="top.blueboy.waiter.impl.WaiterImpl" />
        <bean id="proxyFactory" class="top.blueboy.factory.ProxyFactory">
            <property name="beforeAdvice" ref="beforeAdvice" />
            <property name="afterAdvice" ref="afterAdvice" />
            <property name="targetOjb" ref="manWaiter" />
        </bean>
</beans>@Test
public void test1() {
ApplicationContext context = new ClassPathXmlApplicationContext("applicationContext.xml");
ProxyFactory facory = (ProxyFactory)context.getBean("proxyFactory");
Waiter manWaiter = (Waiter)facory.createProxyOjb();
manWaiter.service();
}AOP
两个应用:事务处理、日志处理。
什么是 AOP
不修改源码的情况下做到给目标方法增强功能。
AOP 相关概念
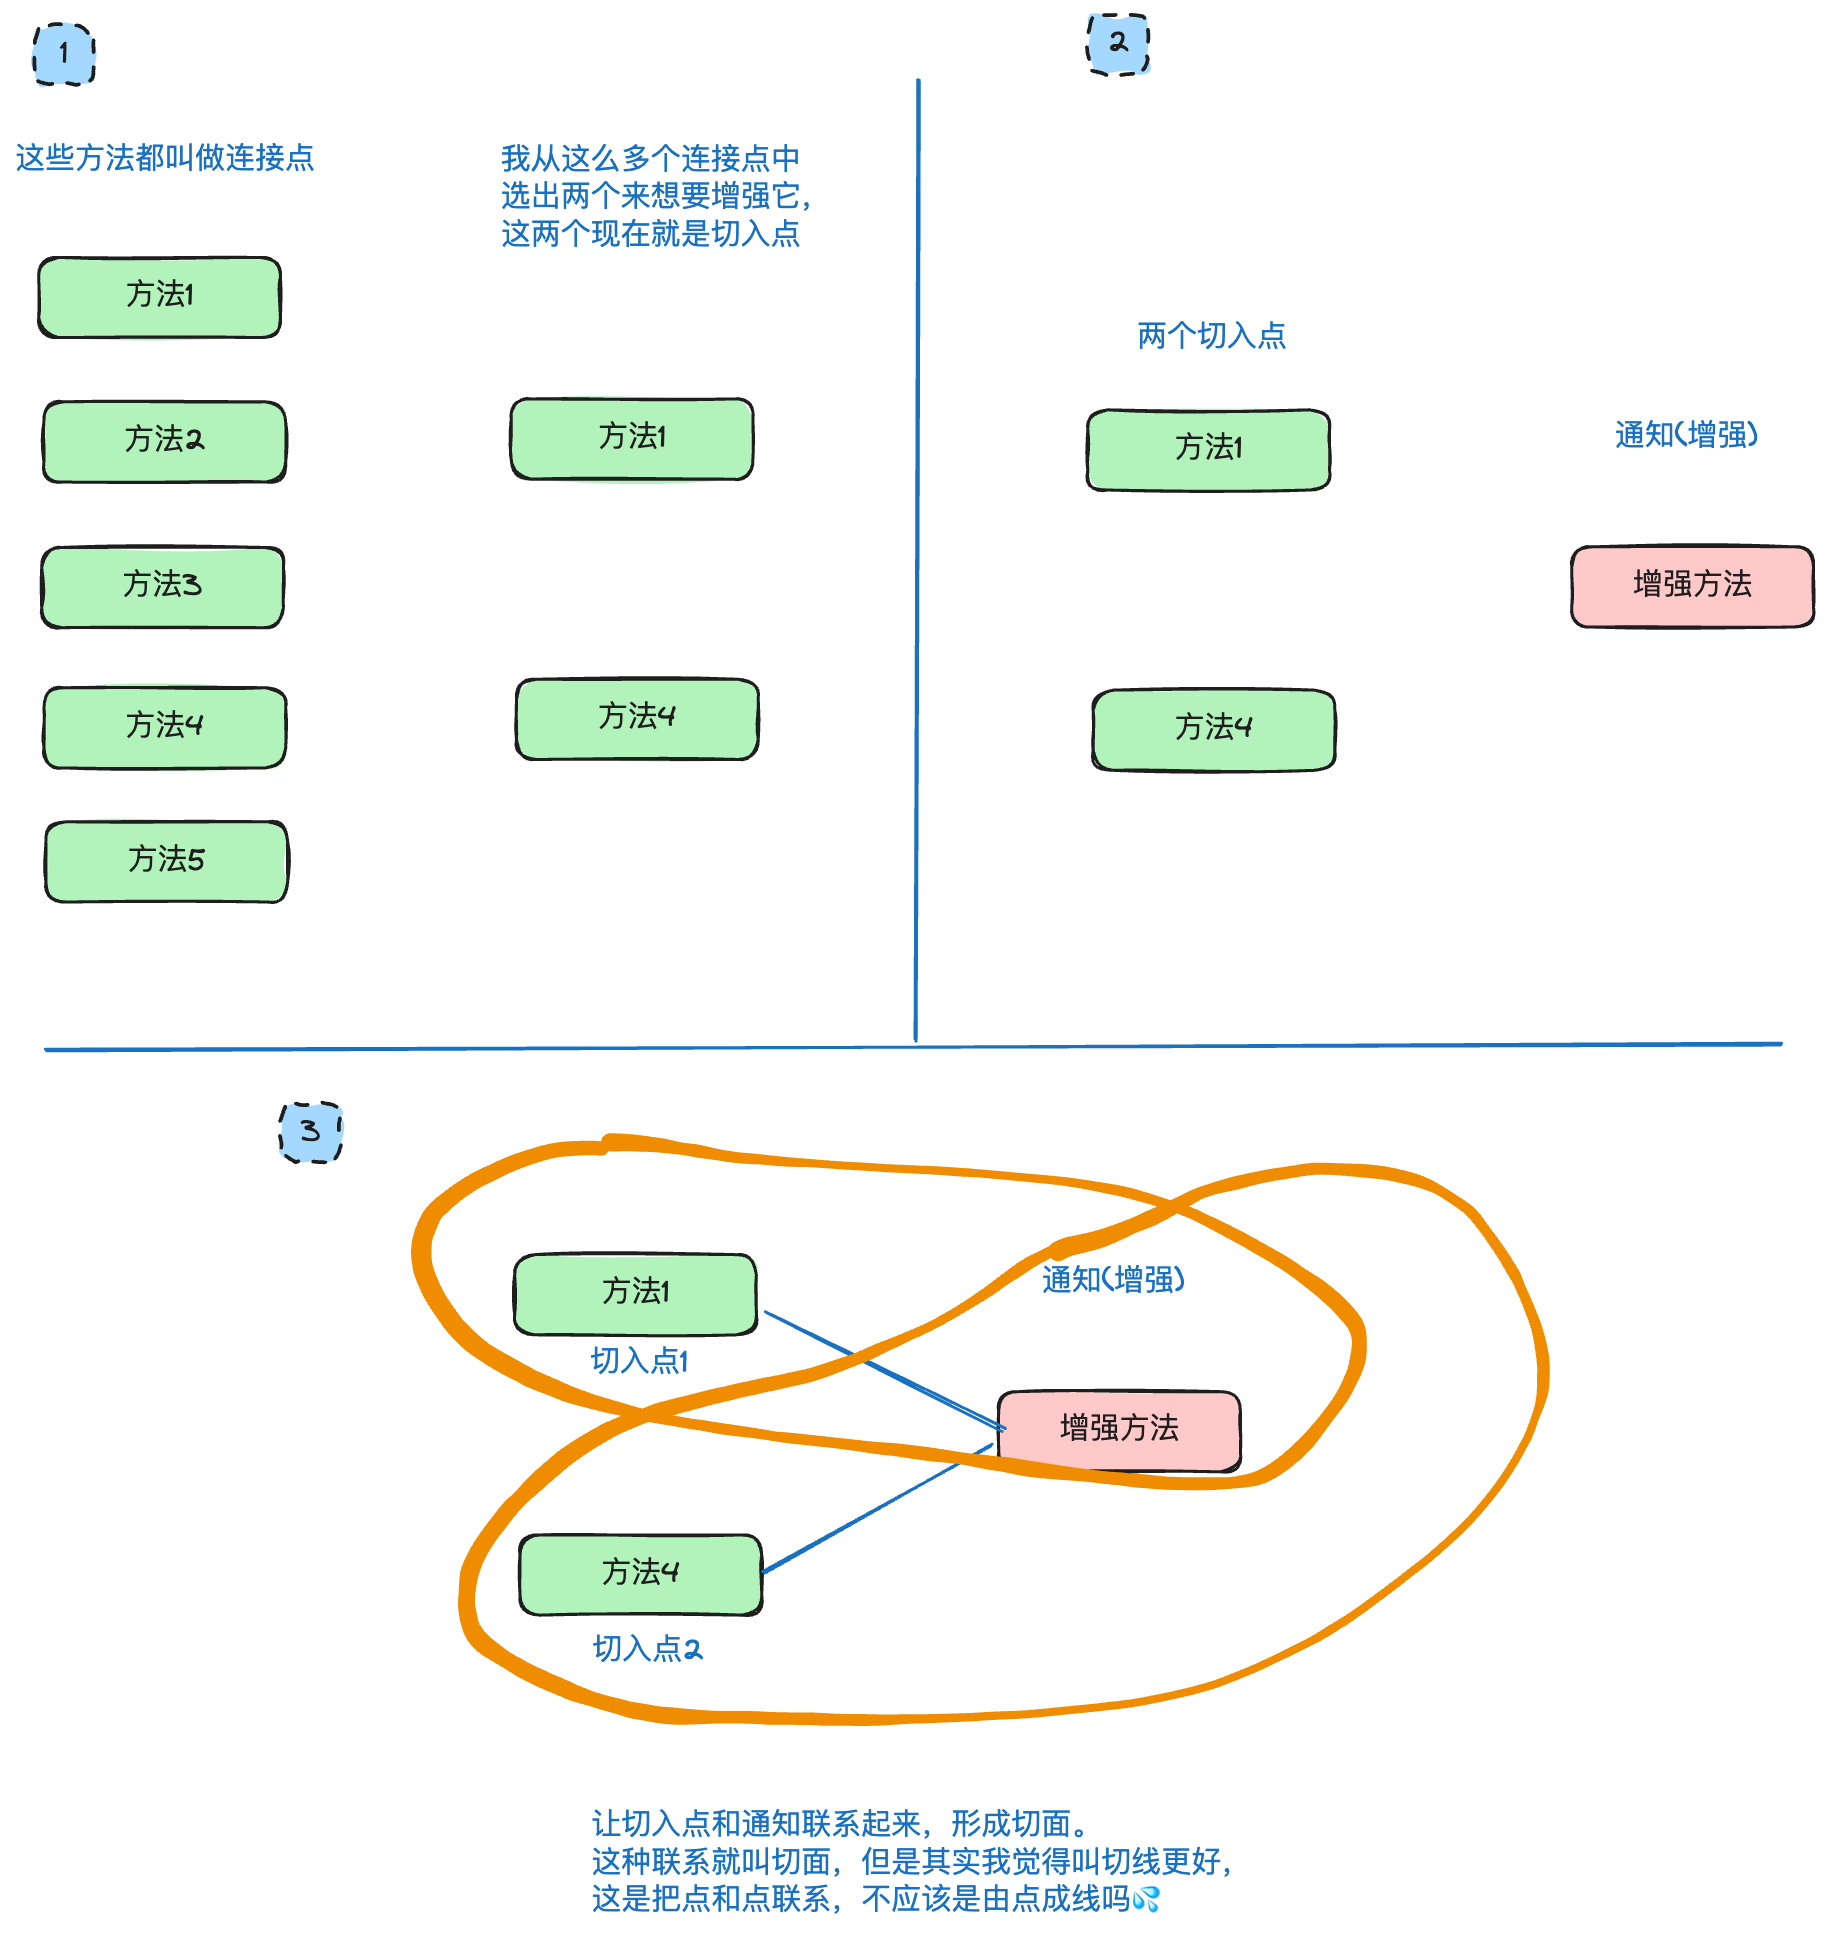
- Joinpoint(连接点):有可能被增强的方法
- Pointcut(切入点):实际被增强的方法
- Advice(通知/ 增强):封装增强业务逻辑的方法
- Aspect(切面):切点+通知
- Weaving(织入):将切点与通知结合的过程
AOP 快速入门(XML)
before/after 前置/后置通知
public interface AfterAdvice {
    void after();
}
public class AfterAdviceImpl implements AfterAdvice {
@Override
public void after() {
System.out.println("欢迎下次光临...");
}
}public interface AfterAdvice {
void after();
}public class AfterAdviceImpl implements AfterAdvice {
@Override
public void after() {
System.out.println("欢迎下次光临...");
}
}public interface IWaiter {
//上菜
void food();
//上酒
void wine();
//上烟
void smoke();
}public class IWaiterImpl implements IWaiter {
@Override
public void food() {
System.out.println("菜来了~");
}
@Override
public void wine() {
System.out.println("82年的拉菲给您准备好了");
}
@Override
public void smoke() {
System.out.println("铃铛smoke");
}
}applicationContext.xml
<?xml version="1.0" encoding="UTF-8"?>
<beans xmlns="http://www.springframework.org/schema/beans"
xmlns:xsi="http://www.w3.org/2001/XMLSchema-instance"
xmlns:aop="http://www.springframework.org/schema/aop"
xsi:schemaLocation="http://www.springframework.org/schema/beans
http://www.springframework.org/schema/beans/spring-beans.xsd
http://www.springframework.org/schema/aop
http://www.springframework.org/schema/aop/spring-aop.xsd">
<bean id="beforeAdvice" class="top.blueboy.advice.BeforeAdviceImpl"/>
<bean id="afterAdvice" class="top.blueboy.advice.AfterAdviceImpl"/>
<bean id="manWaiter" class="top.blueboy.waiter.impl.IWaiterImpl"/>
<!-- aop配置标签开始 -->
<aop:config>
<!-- 定义了一个切面,指名了增强方法的来源(通知) -->
<aop:aspect ref="beforeAdvice">
<!--aop:运行时机:在目标方法执行之前 --> <!-- pointcut:指定目标方法在哪里(切入点) -->
<aop:before method="before" pointcut="execution(public void top.blueboy.waiter.impl.IWaiterImpl.food())"/>
</aop:aspect>
<aop:aspect ref="afterAdvice">
<!--aop:运行时机:在目标方法执行之前 --> <!-- pointcut:指定目标方法在哪里(切入点) -->
<aop:after method="after-returning" pointcut="execution(public void top.blueboy.waiter.impl.IWaiterImpl.food())"/>
</aop:aspect>
</aop:config>
</beans>@Test
public void test1() throws SQLException {
ApplicationContext ctx = new ClassPathXmlApplicationContext("applicationContext.xml");
IWaiter manWaiter = (IWaiter)ctx.getBean("manWaiter");
manWaiter.food();
}您好!男仆为您服务!
菜来了~
欢迎下次光临...
进程已结束,退出代码为 0around 环绕通知
applicationContext.xml
<!-- aop配置标签开始 -->
<aop:config>
<!-- 定义了一个切面,指名了增强方法的来源(通知) -->
<aop:aspect ref="waiterAdvice">
<!--aop:运行时机:在目标方法执行之前 --> <!-- pointcut:指定目标方法在哪里(切入点) -->
<aop:around method="around" pointcut="execution(public void top.blueboy.waiter.impl.IWaiterImpl.food())"/>
</aop:aspect>
</aop:config>package top.blueboy.advice;
import org.aspectj.lang.ProceedingJoinPoint;
public class WaiterAdvice {
//前置通知
public void before() {
System.out.println("你好...");
}
//后置通知
public void afterReturning() {
System.out.println("吃好喝好...");
}
//环绕通知
public void around(ProceedingJoinPoint pjp) throws Throwable {
try {
System.out.println("你好!");
Object proceed = pjp.proceed();
System.out.println("吃好喝好!");
} catch (Exception e) {
System.out.println("....(呆若木鸡)");
} finally {
System.out.println("再见...");
}
}
//异常抛出通知
public void afterThrowing() {
System.out.println("........");
}
//最终通知
public void after() {
System.out.println("再见...");
}
}@Test
public void test2() {
ApplicationContext ctx = new ClassPathXmlApplicationContext("applicationContext.xml");
IWaiter manWaiter = (IWaiter)ctx.getBean("manWaiter");
manWaiter.food();
}你好!
菜来了~
吃好喝好!
再见...
进程已结束,退出代码为 0异常后通知/最终通知
<aop:after-throwing method="afterThrowing" pointcut="execution(* *..*(..))" />
<aop:after method="after" pointcut="execution(* *..*(..))" />切点表达式
execution([修饰符] 返回值类型 包名.类名.方法名(参数))注意:
访问修饰符可以省略
返回值类型、包名、类名、方法名可以使用星号*代表任意
包名与类名之间一个点 . 代表当前包下的类,两个点 .. 表示当前包及其子包下的类
参数列表可以使用两个点 .. 表示任意个数,任意类型的参数列表
案例:
execution(void tech.code2048.aop.ManWaiter.food())
execution(* tech.code2048.aop.ManWaiter.*(..))
execution(* tech.code2048.aop..*.*(..))
execution(* *..*.*(..))```AOP 快速入门(注解)
package top.blueboy.config;
import org.springframework.context.annotation.ComponentScan;
import org.springframework.context.annotation.Configuration;
import org.springframework.context.annotation.EnableAspectJAutoProxy;
//配置这个类是配置类
@Configuration
//配置扫描这个包下的注解
@ComponentScan("top.blueboy")
//开启AOP注解的使用
@EnableAspectJAutoProxy
public class SpringConfig {
}package top.blueboy.waiter.impl;
import org.springframework.stereotype.Component;
import top.blueboy.waiter.IWaiter;
//表示交由Spring管理(来扫我啊!)
@Component
public class IWaiterImpl implements IWaiter {

    @Override
    public void food() {
        System.out.println("菜来了~");
    }

    @Override
    public void wine() {
        System.out.println("82年的拉菲给您准备好了");
    }

    @Override
    public void smoke() {
        System.out.println("铃铛smoke");
    }
}import org.aspectj.lang.ProceedingJoinPoint;
import org.aspectj.lang.annotation.Around;
import org.aspectj.lang.annotation.Aspect;
import org.aspectj.lang.annotation.Pointcut;
import org.springframework.stereotype.Component;
//表示交由Spring管理(来扫我啊!)
@Component
//标识该类是一个切面类
@Aspect
public class MyAdvise {
//定义切入点
//任意返回值 impl包下的任意方法,任意参数的方法都给增强
@Pointcut("execution(* top.blueboy.waiter..*.*(..))")
public void pt() {
}
@Around("pt()")
public void around(ProceedingJoinPoint pjp) {
try {
System.out.println("around before advice ...");//前置通知
pjp.proceed();//表示对原始操作的调用
System.out.println("around after advice ...");//后置通知
} catch (Throwable e) {
System.out.println("异常了...");//异常通知
throw new RuntimeException(e);
} finally {
System.out.println("我一定会运行的...");//最终通知
}
}
}图示: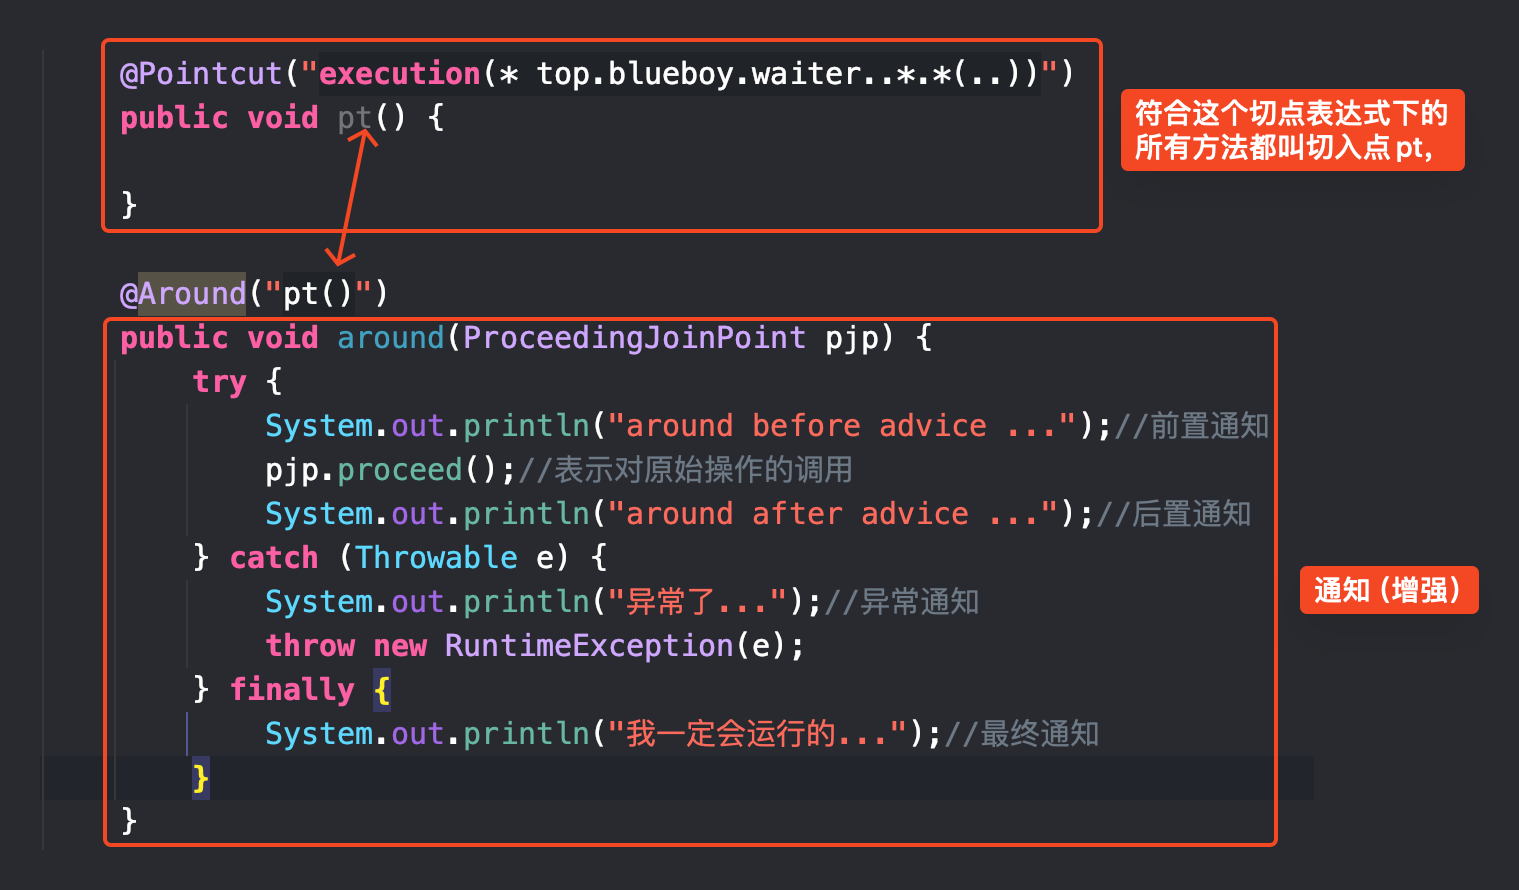
AOP 中代理对象的两个阶段:
阶段 1:Spring 启动时
扫描和匹配:
- Spring 在启动时会扫描所有 Bean,检查是否有方法匹配切面的拦截规则(如
@Around、@Before等)。 - 如果发现某个 Bean 的方法匹配切面规则,Spring 会将该 Bean 标记为需要代理。
- Spring 在启动时会扫描所有 Bean,检查是否有方法匹配切面的拦截规则(如
代理对象的创建准备:
- Spring 会为目标 Bean 准备好代理对象的创建逻辑,但此时并不会立即创建代理对象。
- 这个阶段只是确定了哪些 Bean 需要代理,并为它们配置了代理工厂(
ProxyFactory)。
阶段 2:第一次调用目标方法时
- 懒加载机制:
- Spring 默认使用懒加载机制来创建代理对象。也就是说,代理对象只有在第一次被调用时才会真正创建。
- 当请求进入目标方法时,Spring 会检查是否需要代理。如果需要,则会动态生成代理对象。
Spring 整合 Mybatis(XML)
pom.xml
<?xml version="1.0" encoding="UTF-8"?>
<project xmlns="http://maven.apache.org/POM/4.0.0"
         xmlns:xsi="http://www.w3.org/2001/XMLSchema-instance"
         xsi:schemaLocation="http://maven.apache.org/POM/4.0.0 http://maven.apache.org/xsd/maven-4.0.0.xsd">
    <modelVersion>4.0.0</modelVersion>

    <groupId>top.blueboy</groupId>
    <artifactId>spring_mybatis</artifactId>
    <version>1.0-SNAPSHOT</version>

    <properties>
        <maven.compiler.source>8</maven.compiler.source>
        <maven.compiler.target>8</maven.compiler.target>
        <project.build.sourceEncoding>UTF-8</project.build.sourceEncoding>
    </properties>

    <dependencies>
        <dependency>
            <groupId>org.springframework</groupId>
            <artifactId>spring-context</artifactId>
            <version>5.2.6.RELEASE</version>
        </dependency>
        <dependency>
            <groupId>org.springframework</groupId>
            <artifactId>spring-jdbc</artifactId>
            <version>5.2.6.RELEASE</version>
        </dependency>
        <dependency>
            <groupId>org.mybatis</groupId>
            <artifactId>mybatis-spring</artifactId>
            <version>2.0.3</version>
        </dependency>
        <dependency>
            <groupId>org.mybatis</groupId>
            <artifactId>mybatis</artifactId>
            <version>3.4.5</version>
        </dependency>
        <dependency>
            <groupId>mysql</groupId>
            <artifactId>mysql-connector-java</artifactId>
            <version>5.1.47</version>
        </dependency>
        <dependency>
            <groupId>com.alibaba</groupId>
            <artifactId>druid</artifactId>
            <version>1.1.5</version>
        </dependency>
        <dependency>
            <groupId>log4j</groupId>
            <artifactId>log4j</artifactId>
            <version>1.2.17</version>
        </dependency>
        <dependency>
            <groupId>junit</groupId>
            <artifactId>junit</artifactId>
            <version>4.13</version>
            <scope>test</scope>
        </dependency>
        <dependency>
            <groupId>org.projectlombok</groupId>
            <artifactId>lombok</artifactId>
            <version>1.18.30</version>
        </dependency>
        <dependency>
            <groupId>org.springframework</groupId>
            <artifactId>spring-aspects</artifactId>
            <version>5.2.6.RELEASE</version>
        </dependency>
        <dependency>
            <groupId>org.springframework</groupId>
            <artifactId>spring-tx</artifactId>
            <version>5.2.6.RELEASE</version>
        </dependency>
    </dependencies>

</project>
jdbc.properties
jdbc.driver=com.mysql.jdbc.Driver
jdbc.url=jdbc:mysql://localhost:3306/springLearning1?useSSL=false&useUnicode=true&characterEncoding=utf8
jdbc.username=root
jdbc.password=root
log4j.properties
##
## Hibernate, Relational Persistence for Idiomatic Java
##
## License: GNU Lesser General Public License (LGPL), version 2.1 or later.
## See the lgpl.txt file in the root directory or <http://www.gnu.org/licenses/lgpl-2.1.html>.
##

#### direct log messages to stdout ###
log4j.appender.stdout=org.apache.log4j.ConsoleAppender
log4j.appender.stdout.Target=System.err
log4j.appender.stdout.layout=org.apache.log4j.PatternLayout
log4j.appender.stdout.layout.ConversionPattern=%d{ABSOLUTE} %5p %c{1}:%L - %m%n

#### direct messages to file hibernate.log ###
##log4j.appender.file=org.apache.log4j.FileAppender
##log4j.appender.file.File=hibernate.log
##log4j.appender.file.layout=org.apache.log4j.PatternLayout
##log4j.appender.file.layout.ConversionPattern=%d{ABSOLUTE} %5p %c{1}:%L - %m%n

#### set log levels - for more verbose logging change 'info' to 'debug' ###

log4j.rootLogger=debug, stdout
SqlMapConfig.xml
<?xml version="1.0" encoding="UTF-8" ?>
<!DOCTYPE configuration PUBLIC "-//mybatis.org//DTD Config 3.0//EN" "http://mybatis.org/dtd/mybatis-3-config.dtd">
<configuration>
    <settings>
        <!-- 打印查询语句 -->
        <setting name="logImpl" value="LOG4J" />
    </settings>
</configuration>
department.sql
DROP TABLE IF EXISTS `department`;

CREATE TABLE `department` (
  `did` int(11) NOT NULL AUTO_INCREMENT COMMENT '主键',
  `dname` varchar(50) DEFAULT NULL COMMENT '部门名称',
  `dlocation` varchar(50) DEFAULT NULL COMMENT '部门位置',
  PRIMARY KEY (`did`)
) ENGINE=InnoDB AUTO_INCREMENT=43 DEFAULT CHARSET=utf8mb4 COMMENT='部门表';

/*Data for the table `department` */
insert  into `department`(`did`,`dname`,`dlocation`) values
(1,'研发部','北京'),
(2,'市场部','北京'),
(3,'行政部','北京'),
(4,'财务部','北京'),
(5,'法务部','北京'),
(6,'总裁办公室','北京');@Data
@AllArgsConstructor
@NoArgsConstructor
public class Department {
private Integer did;
private String dname;
private String dlocation;
}@Data
@AllArgsConstructor
@NoArgsConstructor
public class Account implements Serializable {
private Integer id;
private String name;
private Integer money;
}public interface DepartmentMapper {
List<Department> selectAll();
}public interface AccountMapper {
Account selectById(Integer id);
void update(Account account) throws SQLException;
}public interface DepartmentService {
List<Department> findAll();
}public interface AccountService {
void trans(Integer src, Integer dest, Integer money) throws SQLException;
}public class DepartmentServiceImpl implements DepartmentService {
private DepartmentMapper departmentMapper;
public List<Department> findAll() {
return departmentMapper.selectAll();
}
public void setDepartmentMapper(DepartmentMapper departmentMapper) {
this.departmentMapper = departmentMapper;
}
}public class AccountServiceImpl implements AccountService {
AccountMapper accountMapper;
public void setAccountMapper(AccountMapper accountMapper) {
this.accountMapper = accountMapper;
}
@Override
public void trans(Integer src, Integer dest, Integer money) throws SQLException {
Account srco = accountMapper.selectById(src);
Account desto = accountMapper.selectById(dest);
if (srco == null) {
throw new RuntimeException("源账户不存在");
}
if (desto == null) {
throw new RuntimeException("目标账户不存在");
}
if (srco.getMoney() < money) {
throw new RuntimeException("钱不够了");
}
Account srcn = new Account();
srcn.setId(srco.getId());
srcn.setMoney(srco.getMoney() - money);
Account destn = new Account();
destn.setId(desto.getId());
destn.setMoney(desto.getMoney() + money);
accountMapper.update(srcn);
//System.out.println(1/0);
accountMapper.update(destn);
}
}DepartmentMapper.xml
<?xml version="1.0" encoding="UTF-8" ?>
<!DOCTYPE mapper PUBLIC "-//mybatis.org//DTD Mapper 3.0//EN" "http://mybatis.org/dtd/mybatis-3-mapper.dtd" >
<mapper namespace="top.blueboy.mapper.DepartmentMapper">

    <select id="selectAll" resultType="department">
        SELECT * FROM department
    </select>
</mapper>
AccountMapper.xml
<?xml version="1.0" encoding="UTF-8" ?>
<!DOCTYPE mapper PUBLIC "-//mybatis.org//DTD Mapper 3.0//EN" "http://mybatis.org/dtd/mybatis-3-mapper.dtd" >
<mapper namespace="top.blueboy.mapper.AccountMapper">
    <update id="update">
        update account set money=#{money} where id=#{id}
    </update>
    <select id="selectById" resultType="top.blueboy.bean.Account">
        select * from account where id=#{id}
    </select>
</mapper>
applicationContext.xml
<?xml version="1.0" encoding="UTF-8"?>
<beans xmlns="http://www.springframework.org/schema/beans"
       xmlns:xsi="http://www.w3.org/2001/XMLSchema-instance"
       xmlns:context="http://www.springframework.org/schema/context"
       xmlns:tx="http://www.springframework.org/schema/tx"
       xmlns:aop="http://www.springframework.org/schema/aop"
       xsi:schemaLocation="
        http://www.springframework.org/schema/beans
        http://www.springframework.org/schema/beans/spring-beans.xsd
        http://www.springframework.org/schema/context
        http://www.springframework.org/schema/context/spring-context.xsd
        http://www.springframework.org/schema/tx
        http://www.springframework.org/schema/tx/spring-tx.xsd
        http://www.springframework.org/schema/aop
        http://www.springframework.org/schema/aop/spring-aop.xsd">

    <!-- jdbc文件 -->
    <context:property-placeholder location="classpath:jdbc.properties"/>
    <!--dataSource bean -->
    <bean id="dataSource" class="com.alibaba.druid.pool.DruidDataSource">
        <property name="driverClassName" value="${jdbc.driver}" />
        <property name="url" value="${jdbc.url}" />
        <property name="username" value="${jdbc.username}" />
        <property name="password" value="${jdbc.password}" />
    </bean>
    <!--
        sqlSessionFactory bean

     -->
    <bean id="sqlSessionFactory" class="org.mybatis.spring.SqlSessionFactoryBean">
        <!-- 配置别名 -->
        <property name="typeAliasesPackage" value="top.blueboy.bean"/>
        <!-- 配置数据源 -->
        <property name="dataSource" ref="dataSource"/>
        <property name="configLocation" value="classpath:SqlMapConfig.xml"/>
    </bean>
    <!--
        mapperScannerConfigurer bean
        扫描mapper包,绑定接口和xml的关系,并自动把接口实现类对象配置成bean放在容器中,
        想象它自动给你配置了若干个 <bean class="XxxMapperImpl"></bean>
        这些XxxMapperImpl都是绑定好关系的实现类,
        然后你之后可以用getBean(接口类型)获取到XxxMapperImpl的对象。
     -->
    <bean id="mapperScannerConfigurer" class="org.mybatis.spring.mapper.MapperScannerConfigurer">
        <property name="basePackage" value="top.blueboy.mapper"/>
    </bean>


    <!--
        DepartmentServiceImpl bean
        使用此id即可从容器中获得一个 DepartmentServiceImpl类型的实现类对象
     -->
    <bean id="departmentService" class="top.blueboy.service.impl.DepartmentServiceImpl">
        <property name="departmentMapper" ref="departmentMapper"/>
    </bean>

    <!--
        AccountServiceImpl bean
        使用此id即可从容器中获得一个 AccountServiceImpl类型的实现类对象
     -->
    <bean id="accountService" class="top.blueboy.service.impl.AccountServiceImpl">
        <property name="accountMapper" ref="accountMapper"/>
    </bean>


    <!-- 平台事务管理器 bean -->
    <bean id="transactionManager" class="org.springframework.jdbc.datasource.DataSourceTransactionManager" >
        <property name="dataSource" ref="dataSource" />
    </bean>
    <!-- 配置通知(增强); -->
    <tx:advice id="txAdvice" transaction-manager="transactionManager">
        <tx:attributes>
            <tx:method name="*"/>
        </tx:attributes>
    </tx:advice>
    <!-- 配置切面(通知 + 切入点) -->
    <aop:config>
        <aop:advisor advice-ref="txAdvice" pointcut="execution(* top.blueboy.service..*(..))"/>
    </aop:config>

</beans>
public class Test1 {
//测试从容器中获取 DruidDataSource对象
@Test
public void testDataSource() {
ClassPathXmlApplicationContext ctx = new ClassPathXmlApplicationContext("classpath:applicationContext.xml");
DataSource dataSource = (DruidDataSource)ctx.getBean("dataSource");
System.out.println(dataSource);
}
//spring+mybatis;在xml中配置好SqlSessionFactoryBean和MapperScannerConfigurer,和DepartmentServiceImpl
@Test
public void testSelectAll() {
ClassPathXmlApplicationContext ctx = new ClassPathXmlApplicationContext("applicationContext.xml");
/*
* 通过类型获取;Spring看到我们想获取一个DepartmentMapper.class类型的对象,
* Spring发现容器中刚好有实现DepartmentMapper接口的bean,
* (加载核心配置文件,MapperScannerConfigurer扫描包后自动把xml和接口绑定创建实现类后存入容器中,类型就是DepartmentMapper),
* 即最终获取到绑定好方法和查询语句关系的实现对象返还给我们。
* */ DepartmentMapper bean = ctx.getBean(DepartmentMapper.class);
System.out.println(bean.selectAll());
}
@Test
public void testDepartmentService() {
ClassPathXmlApplicationContext ctx = new ClassPathXmlApplicationContext("applicationContext.xml");
DepartmentService bean1 = ctx.getBean(DepartmentService.class);
System.out.println(bean1.findAll());
/*
* 使用 DepartmentService.class 作为类型参数
是因为在 Spring 中,bean 的类型是根据接口进行
定义和操作的。尽管 DepartmentServiceImpl
是实现类,但是在 Spring 容器中,我们更关注于
bean 的接口类型,而不是具体的实现类类型。
* */
//以下方式不可用 X
//DepartmentServiceImpl bean2 = ctx.getBean(DepartmentServiceImpl.class);
//System.out.println(bean2.findAll());
}
//声明式事务控制
@Test
public void testAccountService() throws SQLException {
ClassPathXmlApplicationContext ctx = new ClassPathXmlApplicationContext("applicationContext.xml");
AccountService accountService = ctx.getBean(AccountService.class);
accountService.trans(1, 2, 10);
}
}Spring 整合 Mybatis(注解)
//引入其他配置类
@Import(MybatisConfig.class)
//配置包扫描(似的在其他地方的注解配置生效)
@ComponentScan("top.blueboy")
public class SpringConfig {
}
//设置这个类设置为配置类
@Configuration
//导入jdbc配置文件
@PropertySource("classpath:jdbc.properties")
//设置扫描特定包下的mapper
@MapperScan("top.blueboy.mapper")
//配置事务的注解驱动(配合事务平台管理器让我们可以进行事务操作)
@EnableTransactionManagement
public class MybatisConfig {
//使用Value注解注入简单类型(8+1)
@Value("${jdbc.driver}")
private String driverClassName;
@Value("${jdbc.url}")
private String url;
@Value("${jdbc.username}")
private String username;
@Value("${jdbc.password}")
private String password;
@Bean
/*
* 配置数据源的 bean
* 把方法返回的对象配置成bean,交由容器管理,
* 现在容器中就有一个 DataSource类型的对象 dataSource可供使用。
* */
public DataSource dataSource() {
DruidDataSource dataSource = new DruidDataSource();
dataSource.setDriverClassName(driverClassName);
dataSource.setUrl(url);
dataSource.setUsername(username);
dataSource.setPassword(password);
return dataSource;
}
@Bean
/*
* 创建 sqlSessionFactory 的bean
* 回顾一下,我们之前的使用mybatis时,是不是每次都要用这个东西的对象?
* 而且每次都是那4步:
* 1创建流,2使用流build出sqlSessionFactory对象,
* 然后再获取sqlSession对象,再获取mapper对象执行动作。
*
* 把配置好各种属性的 sqlSessionFactoryBean对象交由给容器管理。
* */
public SqlSessionFactoryBean sqlSessionFactoryBean(DataSource dataSource) {
//创建SqlSessionFactoryBean对象
SqlSessionFactoryBean sqlSessionFactoryBean = new SqlSessionFactoryBean();
/*
* 配置数据源
* 这里使用了按类型自动装配,
* 我们在参数中填入了 DataSource类型的 dataSource,
* Spring一看你需要这个类型的参数,它又一看自己的容器中,
* 返现刚好有DataSource类型的对象(就是上面刚刚配的),
* 于是给你自动装配上,所以dataSource变量是有效的。
*/
sqlSessionFactoryBean.setDataSource(dataSource);
//配置别名
sqlSessionFactoryBean.setTypeAliasesPackage("top.blueboy.bean");
//加载MyBatis的核心配置文件
sqlSessionFactoryBean.setConfigLocation(new PathMatchingResourcePatternResolver().getResource("classpath:SqlMapConfig.xml"));
return sqlSessionFactoryBean;
}
/*
* 配置事务平台管理器
*
* 我们不但可以使用按照类型自动装配,
* 也可以使用指定的特定的id进行装配
*
* */
@Bean("transactionManager")
public DataSourceTransactionManager transactionManager(@Qualifier("dataSource") DataSource dataSource) {
return new DataSourceTransactionManager(dataSource);
}
}@Service
public class DepartmentServiceImpl implements DepartmentService {
@Autowired
private DepartmentMapper departmentMapper;
public List<Department> findAll() {
return departmentMapper.selectAll();
}
public void setDepartmentMapper(DepartmentMapper departmentMapper) {
this.departmentMapper = departmentMapper;
}
}@Service
public class AccountServiceImpl implements AccountService {
//配置为自动装配,Spring发现容器汇总有这类型的对象,就可以自动装配上。
/*
* 我们已经配置好,sqlSessionFactory MapperScan注解等,大概的执行流程是:
* SpringConfig加载MybatisConfig,初始化绑定完所有的接口和xml之间的关系,
* 并且把绑定好关系的对象交由容器管理,所以这里是可以自动注入好的。
* */
@Autowired
AccountMapper accountMapper;
public void setAccountMapper(AccountMapper accountMapper) {
this.accountMapper = accountMapper;
}
@Override
public void trans(Integer src, Integer dest, Integer money) throws SQLException {
Account srco = accountMapper.selectById(src);
Account desto = accountMapper.selectById(dest);
if (srco == null) {
throw new RuntimeException("源账户不存在");
}
if (desto == null) {
throw new RuntimeException("目标账户不存在");
}
if (srco.getMoney() < money) {
throw new RuntimeException("钱不够了");
}
Account srcn = new Account();
srcn.setId(srco.getId());
srcn.setMoney(srco.getMoney() - money);
Account destn = new Account();
destn.setId(desto.getId());
destn.setMoney(desto.getMoney() + money);
accountMapper.update(srcn);
//System.out.println(1/0);
accountMapper.update(destn);
}
}Spring 整合 Junit
pom.xml
<dependency>
    <groupId>org.springframework</groupId>
    <artifactId>spring-test</artifactId>
    <version>5.2.6.RELEASE</version>
</dependency>
<dependency>
    <groupId>junit</groupId>
    <artifactId>junit</artifactId>
    <version>4.13</version>
    <scope>test</scope>
</dependency>
//指定运行时
@RunWith(SpringJUnit4ClassRunner.class)
//指定Spring的配置文件或配置类(两种方式)
//@SpringJUnitConfig(locations = "classpath:applicationContext.xml")
@SpringJUnitConfig(SpringConfig.class)
public class Test2 {
@Autowired
private DepartmentService departmentService;
@Test
public void testJunit() {
System.out.println(departmentService.findAll());
}
}